Zoom Guide for Attendees
If you're a Speaker, please visit our Zoom Guide for Presenters
Test Your Settings
It is recommended that you test your computer prior to attending a meeting. You can do this by going to zoom.us/test
The test meeting will launch. If this is your first time using Zoom, you will be prompted to download the Zoom Client.
Note: If you would like to install this before launching the test meeting, you can do so here: zoom.us/download
Join a Meeting
- Navigate to the meeting URL in a browser. This should be a link that looks similar to: https://wustl-hipaa.zoom.us/j/####.
- If this is your first time joining a Zoom meeting, you will be prompted to download and run the Zoom Client. Follow the on-screen prompts to install the Client.
- Once the Zoom Client has been installed, your meeting will launch
Audio
Once you enter into a Zoom meeting, you will be prompted to connect your audio. You can also connect your audio by following these steps:
- Click the Join Audio button at the bottom of the Zoom meeting.
- Select whether you want to connect to the audio via Phone Call or Computer Audio.
- If connecting via Phone Call, dial the number shown and follow the prompts to enter the Meeting ID and Participant ID. Click Done once you are connected via phone.
- If connecting via Computer Audio, click Test Computer Mic & Speakers to check your settings. After testing, click Join Audio Conference by Computer.
Remember to always use a headset or headphones when connecting to audio with your computer to help avoid any audio feedback issue
 Chat
Chat
The chat feature can be helpful if you want to share a message to the attendees or faculty without interrupting the speaker. It can also be useful when communicating with others if you have technical issues.
- Click the Chat button at the bottom of the Zoom meeting. This will open the chat panel.
- Select your audience for your chat message using the To selector at the bottom of the chat window.
- Selecting a specific person will allow you send a private message to just that individual, whereas selecting everyone will send your message to all meeting participants.
- Type in your message then press the Enter key on your keyboard to send the message.
 Q&A (Webinar only)
Question & Answer: Open the Q&A window, allowing you to ask questions to the host and panelists. They can either reply back to you via text in the Q&A window or answer your question live.
To ask a question:
- Type your question into the Q&A box. Click Send.
Note: Check Send Anonymously if you do not want your name attached to your question in the Q&A.(based on availability of the webinar) - If the host replies via the Q&A, you will see a reply in the Q&A window.
- The host can also answer your question live (out loud). You will see a notification in the Q&A window if the host plans to do this.
- As an attendee you can also like or comment on other attendee’s questions. This helps the host or participant identify popular questions, especially in a webinar with many attendees.
- Click the thumbs up icon to like a comment.
Tip: The number beside the icon is the total number of likes the question has received so far.
- Click the thumbs up icon to like a comment.
View Options
In the top right of the meeting window, click on a button to toggle your view.
1. Swap shared screen with video
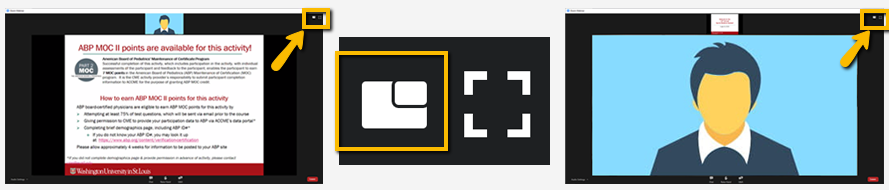
2. Full Screen Mode

Note: To exit full screen mode, click View Options and select "Exit Full Screen".
